
Introduction
Flushing a hydraulic system is essential for maintaining optimal performance and preventing contamination-related failures. The process begins by draining the existing fluid and inspecting components for debris or wear. Use a compatible flushing fluid to circulate through the system, effectively removing contaminants from lines, valves, and reservoirs. Proper filtration during this step ensures thorough cleaning. After flushing, refill the system with clean, recommended hydraulic fluid and bleed any air to maintain pressure consistency. Regular flushing as part of maintenance schedules helps extend equipment life and ensures reliable system operation.
Flushing a hydraulic system is a crucial maintenance procedure that ensures the removal of contaminants, old fluids, and debris that can compromise the efficiency and longevity of the hydraulic components. Properly flushing the system helps prevent damage, reduce wear and tear, and maintain optimal performance. Here’s a step-by-step guide on how to effectively flush a hydraulic system.
Types of Hydraulic Flushing
There are several methods for flushing a hydraulic system, each with its own advantages and applications to consider:
Double oil and filter change: This is the simplest method, involving draining the old fluid, replacing the filter, refilling with new fluid, running the system, and then repeating the process.
High-velocity flushing: This method uses specialized equipment to circulate low-viscosity fluid at high velocities, creating turbulence to dislodge contaminants.
Chemical flushing: Chemical cleaners are used to dissolve and remove stubborn deposits and varnish.
Power flushing: This combines high-velocity flushing with chemical cleaning for a more thorough cleanse.
The choice of flushing method depends on the level of contamination, the type of hydraulic system, and the desired level of cleanliness.
Step 1: Preparation
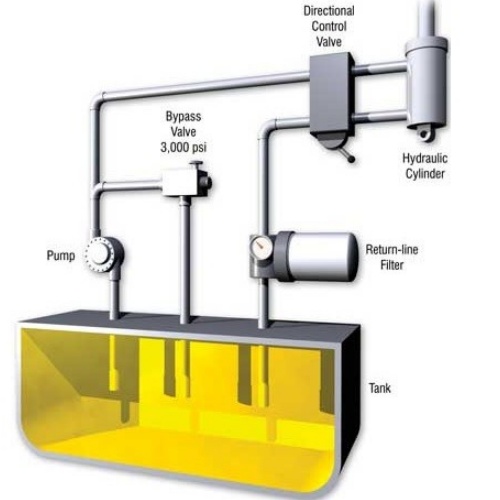
Before starting the flushing process, ensure you have the necessary tools and materials, including new hydraulic fluid, filters, flushing fluid (if required), and protective gear. It’s also essential to understand the system’s layout and have access to the service manual for specific guidelines related to your equipment.
Step 2: Drain the Old Hydraulic Fluid
Begin by draining the existing hydraulic fluid from the system. Locate the drain plugs or valves on the reservoir and allow the fluid to completely drain into a suitable container. This step is vital to remove as much old fluid as possible, which may contain contaminants and degraded additives.
Step 3: Clean the Reservoir
Once the fluid is drained, clean the reservoir thoroughly. Remove any sludge, deposits, or residue that may have accumulated over time. Use a lint-free cloth or brush, and avoid introducing new contaminants during this process. Some technicians recommend using a specialized cleaning solution compatible with hydraulic systems.
Step 4: Replace Filters
Next, replace the hydraulic system filters. Old filters can harbor debris and contaminants that could circulate back into the system after flushing. Installing new filters helps ensure that the system remains clean during and after the flushing process.
Step 5: Add Flushing Fluid (if applicable)
If the system requires flushing fluid, add it according to the manufacturer’s recommendations. Flushing fluid is typically used to dissolve and suspend contaminants, allowing them to be removed from the system more effectively. Ensure that the flushing fluid is compatible with the system’s materials and components.
Step 6: Operate the System
With the flushing fluid in the system (if used), operate the hydraulic equipment to circulate the fluid through all components, including cylinders, valves, and hoses. This step allows the fluid to pick up and carry away contaminants. Run the system at various operating pressures and temperatures as recommended to ensure thorough cleaning.
Step 7: Drain the Flushing Fluid
After circulating the flushing fluid, drain it from the system as you did with the old hydraulic fluid. This step ensures that any contaminants loosened during flushing are removed from the system.
Step 8: Refill with New Hydraulic Fluid
Once the flushing fluid is drained, replace the filters again if needed, and refill the system with new, clean hydraulic fluid. Use the correct type and grade of fluid specified by the equipment manufacturer. Ensure that the fluid is filled to the appropriate level.
Step 9: Bleed the System
After refilling, bleed the hydraulic system to remove any trapped air. Air in the system can lead to spongy operation, reduced efficiency, and potential damage. Follow the manufacturer’s procedure for bleeding air, which usually involves operating the system at low speed and pressure while venting air from designated points.
Step 10: Monitor the System
Once the system is flushed and refilled, operate it under normal conditions and monitor for any signs of issues, such as unusual noises, vibrations, or leaks. Check the fluid level and condition after a short period of operation to ensure the system is functioning correctly.